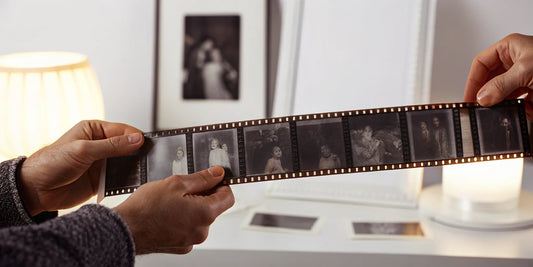
Photographic slides are like tiny, colorful time capsules, each holding a story, a moment, or a familiar smile. There's a unique joy in rediscovering these images and seeing those faces again. To bring these memories back to life and keep them safe for years to come, the best step is to convert slides to digital. This process protects them from fading and physical damage. It also makes them incredibly easy to organize, view, and share with family. This guide will walk you through your options, from DIY methods to professional services, helping you choose the right path for your collection.
Key Takeaways
- Bring Memories Back to Life: Converting your slides to digital format protects them from decay and makes it simple to relive and pass on those cherished family moments.
- Find Your Perfect Conversion Path: Consider your technical skills, how much time you have, your desired image quality, and your budget to select the ideal slide digitization method, whether it's doing it yourself or using a trusted service.
- Get Great Results and Keep Them Safe: A little prep work like cleaning your slides, understanding key features like resolution, and setting up a solid backup plan will ensure your digitized memories look fantastic and last a lifetime.
Why It's Time to Digitize Your Photo Slides
If you have boxes or carousels of old photographic slides tucked away, you're holding onto some incredible memories! But let's be honest, how often do you actually get to see them? Those slides contain precious moments, family history, and vibrant glimpses into the past. Digitizing them is a fantastic way to bring those memories back to life and ensure they stick around for good.
One of the biggest reasons to convert your slides is for preservation. Over time, slides can fade, gather dust, or even suffer from mold and mildew, especially if they're not stored perfectly. Physical damage from accidents, floods, or fires is also a real risk. By digitizing your photos, you create a lasting digital copy that won’t degrade like physical film. This means future generations can enjoy these snapshots of family history just as vividly as you can. Think of it as creating a time capsule that’s immune to the wear and tear of the physical world.
Beyond just keeping them safe, digitizing your slides makes them incredibly easy to share and enjoy. Imagine effortlessly sending a collection of childhood photos to your siblings, or displaying a slideshow of your parents' early years at a family gathering. Digital images can be shared via email, on social media, or viewed on any digital device like your phone, tablet, or smart TV. No more hauling out the clunky projector and screen! Plus, organizing digital files is a breeze compared to sifting through stacks of slides. You can sort them by date, event, or people, making it simple to find exactly what you're looking for.
Finally, creating digital copies serves as an essential backup. If your original slides are the only versions of those images, digitizing them provides crucial peace of mind. Should anything happen to the originals, you'll still have your cherished memories safely stored in a digital format. When you opt for a professional service, you also ensure that the conversion captures the best possible quality, preserving the details and colors of your original slides, making them a joy to look at on modern screens. It’s truly about safeguarding your legacy and making it accessible for everyone to appreciate.
How to Convert Slides to Digital: Exploring Your Options
Okay, so you've got these amazing slides packed with memories, and you're ready to bring them into the digital world. That's fantastic! It means you can easily share them, protect them from fading or damage, and enjoy them on all your modern devices. But when you start looking into how to do it, you'll find there isn't just one way. Think of it like choosing a recipe – some are quick and simple, others take more effort but yield gourmet results, and sometimes, you just want to order takeout from a pro!
The best method for converting your photographic slides to digital really depends on what you're looking for. Are you on a tight budget? Do you prioritize the absolute highest image quality? How much time can you dedicate to the project? Are you comfortable with a bit of tech, or would you prefer a hands-off approach? Answering these questions will help you narrow down your options. We're going to explore some of the most popular and effective ways to digitize your slides, from DIY setups using equipment you might already have or can easily acquire, to leveraging the expertise of professional services. We'll cover everything from versatile flatbed scanners and specialized film scanners to convenient smartphone apps and the benefits of letting experts handle the job. Each path has its own set of perks and considerations, and my goal is to help you find the one that feels like the perfect fit for your precious memories and your current situation. So, let's get started and find the best way for you to preserve those irreplaceable moments!
The Flatbed Scanner Method: Flexible and Affordable
If you're looking for a versatile option that won't break the bank, a flatbed scanner might be your go-to. Many households already have one as part of a multi-function printer, or they can be purchased relatively affordably. As Nostalgic Media highlights, "Flatbed scanners are versatile and can handle various formats, including slides. They allow for high-quality scans and are often more affordable than dedicated film scanners." This flexibility is a big plus, as you can use them for photos and documents too. While they might require a transparency adapter for slides and may not offer the same level of detail as dedicated units, they provide a good balance of quality and cost-effectiveness for many people looking to digitize their slide collection.
Want the Best Quality? Choose a Dedicated Film Scanner
For those who prioritize getting the best possible image quality from their slides, a dedicated film scanner is often the preferred choice. These machines are specifically designed for scanning film formats, including slides, and they typically offer higher resolutions and better dynamic range than general-purpose scanners. According to Digital Camera World, "Dedicating a scanner specifically for film and slides can yield superior image quality. These scanners often come with features like high resolution and dust removal capabilities, making them ideal for preserving details." Investing in one means you're serious about capturing every nuance. While they can be more expensive and have a more specific use, the results can be truly impressive for archiving precious memories.
Let the Pros Handle It: Professional Scanning Services
If the idea of scanning hundreds of slides yourself feels overwhelming, or if you want to ensure the highest quality without investing in specialized equipment and learning new software, a professional scanning service is an excellent option. These services take the entire process off your hands. As Contrastly points out, "Professional scanning services can ensure high-quality results without the hassle of doing it yourself. They often have advanced equipment and expertise to handle various slide formats and restoration needs." Companies like YesVideo specialize in photo transfer and can manage large collections, faded colors, or even slightly damaged slides, delivering digital files ready for you to enjoy and share. It’s a fantastic way to get expert results with minimal effort on your part.
Can You Use Your Smartphone? A Quick and Easy Option
In our mobile-centric world, it's no surprise that your smartphone can also play a role in digitizing slides! Apps designed for this purpose offer a quick and convenient way to capture your slides, especially if you just want to digitize a small batch or quickly share a few memories. For instance, SlideScan, available on the App Store, allows users to quickly digitize slides using their mobile devices. These apps often include features for automatic enhancement and easy sharing. While the quality might not match a dedicated scanner or professional service, the ease of use and immediate results are very appealing for casual scanning projects. It’s a great solution if speed and convenience are your top priorities.
Using Apps and Physical Attachments
To get the best results with this method, you’ll need a good backlight. You can use a tablet or laptop screen set to a blank white page, or a simple lightbox. Place your slide on the light source, then use an app like SlideScan to capture the image. The app will guide you through cropping and often provides automatic color correction. For a more stable setup, you can find affordable physical attachments online that are essentially small, foldable boxes with a built-in LED light and a slot for your phone. This helps eliminate glare and ensures a consistent result. While it’s not the same as a professional photo transfer, it’s a clever and accessible way to digitize a few memories in minutes.
Can I Get My Slides Converted at Costco or Walgreens?
When you're running errands, it can feel incredibly convenient to drop off your box of slides at a familiar place like Costco or Walgreens. And yes, both stores offer services to digitize your media. It’s a tempting one-stop-shop solution, but when you're handling irreplaceable family memories, it’s important to understand what you’re getting. These services act as a middleman, often sending your precious slides to a third-party processing facility. While convenient, this means you have less control and insight into who is handling your memories and what kind of equipment they're using. The quality of the final scan can be a bit of a gamble, which might not be a risk you're willing to take with your only copies of these moments.
The main trade-off with these big-box store services often comes down to quality versus cost. While the price might seem appealing, the results may not live up to the vibrancy of your original slides. As some industry comparisons have noted, if you "care in the least about what your final images are going to look like," a warehouse club's scanning service might not be the best choice. These services are designed for mass processing, which doesn't always allow for the individual attention that can correct color fading, remove dust, or capture the highest possible resolution. It’s a viable option if your goal is simply to have a digital copy, but maybe not if you want to create a high-quality archive for future generations.
If your slides hold deep personal value, consider a service that specializes exclusively in digitizing memories. Professional photo transfer services are built on a foundation of trust and expertise, using state-of-the-art equipment and employing trained technicians who handle every slide by hand. As experts at Contrastly mention, professionals can provide "high-quality results without the hassle," giving you peace of mind that your history is in safe hands. Choosing a dedicated service means you're not just converting your slides; you're investing in preserving them with the clarity and care they deserve, ensuring they look their best on modern screens for years to come.
My Favorite Scanners and Tools for Slide Conversion
If you're thinking about tackling your slide collection yourself, it's great to know there are quite a few scanners and tools out there to help you. Choosing the right one really depends on what you need. Consider how many slides you have, the kind of digital quality you're hoping for, and how much time you can dedicate to the project. Some tools are incredibly straightforward, which is perfect if you're new to this. Others offer more advanced features for those who enjoy getting into the nitty-gritty of image quality.
The main goal here is to find a good match for your specific situation so you can bring those wonderful memories locked in your slides into today’s digital world. This way, they're easy to view, share with family and friends, and keep safe for the future. Let's explore some popular options that could be a great fit for your photo transfer project, helping you make an informed decision.
Kodak's Slide N SCAN and SCANZA: What to Know
When you start looking for ways to convert slides to digital formats, you’ll likely come across the Kodak Slide N SCAN and the SCANZA. The Slide N SCAN is a popular pick, with many users giving it high marks—it boasts a 4.4-star rating from over 10,000 reviews and usually costs around $189.99 for a new one. The SCANZA is a bit more budget-friendly at about $159.99 and holds a respectable 4.2-star rating. Both are designed to be user-friendly, making them excellent choices if you're just starting out or want a simple tool for your slides and negatives. They really help streamline the process of preserving your cherished memories.
Epson Perfection V600: A Versatile Flatbed Option
The Epson Perfection V600 is a really versatile flatbed scanner that does a fantastic job with both film and photos. It's particularly well-regarded for its high-quality output and its ability to handle larger formats, which is a big plus. While it is a bit more of an investment, features like fast batch scanning and excellent resolution can make it a worthwhile choice, especially if you're serious about photography. One thing to keep in mind is its size – it's a bit on the bulky side, so you'll want to make sure you have enough space for it. Many photography enthusiasts consider it among the best film scanners available for home use.
Plustek OpticFilm Series: For High-Quality Scans
If your slide collection primarily consists of 35mm film, the Plustek OpticFilm 8200i SE is a scanner you should definitely consider. It's highly praised for its capability to scan 35mm film at an impressive 7200 dpi resolution, which means you'll get incredibly detailed digital images. A really neat feature is its infrared dust removal, which can significantly cut down on the time you might otherwise spend manually cleaning up your scans. It’s a dedicated machine for 35mm film, so it’s an excellent choice if that’s your main focus. Just be aware that it only handles this specific format and might be a bit slower than some other multi-format options.
Wolverine Titan 8-in-1: An All-in-One Converter
If you've got a diverse collection of photographic media, the Wolverine Titan 8-in-1 converter is a wonderfully versatile tool. True to its name, it can handle a variety of film formats, including your slides, negatives, and even 8mm film, transforming them all into digital images. This multi-format capability is a huge advantage if your memories are stored on different types of film. It’s designed as an all-in-one solution, which can simplify your setup quite a bit. If you're exploring how to convert slides to digital and have various media types, this kind of converter is often recommended for its flexibility.
Using Your DSLR? Try the Nikon ES-2 Adapter
For those who already own a Nikon DSLR camera, the Nikon ES-2 Film Digitizing Adapter offers a smart way to digitize your 35mm film and slides. This adapter attaches directly to your camera, effectively using your DSLR's high-quality sensor and lens to capture your film images. It's an ideal solution for photographers looking to leverage their existing equipment for professional-grade scans without investing in a separate, dedicated scanner. This method gives you excellent control over the final image quality. As Fstoppers points out when discussing how to convert photographic slides, it’s a great way to achieve high-quality results.
For the Highest Quality: Nikon Super CoolScan 5000 ED
When getting the absolute best image quality from your photographic slides is your main goal, the Nikon Super CoolScan 5000 ED is a top-tier choice. This is a dedicated film scanner, meaning it was built for one job: scanning film formats like slides with exceptional resolution and dynamic range. As the experts at Digital Camera World point out, a scanner designed specifically for film can produce superior image quality. This specialization is what allows it to capture incredible detail and color accuracy, making it a favorite among serious archivists and photographers who want to preserve every last detail.
Investing in a high-end scanner like the Super CoolScan 5000 ED shows you're committed to capturing every nuance of your images. Users who have tackled large projects often praise the results as "crazy good," which speaks to its ability to deliver consistently impressive scans. While it does come with a higher price tag and a more specific function, the quality it produces makes it a worthwhile investment for anyone wanting to archive their precious memories with incredible accuracy and detail, ensuring they look stunning for years to come.
Considering Professional Slide Conversion Services?
If the idea of sorting, cleaning, and scanning hundreds or even thousands of slides feels a bit much, or if you're aiming for the highest possible quality without the learning curve of new equipment, professional slide conversion services are a fantastic option. These services take the entire process off your hands, from careful handling of your delicate slides to delivering high-quality digital files. It’s a wonderful way to ensure your precious memories are preserved with expert care, especially if you have a large collection or slides that might need special attention. Many services also offer options for different digital formats and delivery methods, like USB drives or cloud storage, making it super convenient to access and share your newly digitized images with family and friends. Think of it as entrusting your memories to specialists who do this every day, giving you peace of mind and beautifully preserved images without the personal time investment. This route is particularly helpful when you want consistent, professional results, especially for older, more fragile slides that require a delicate touch.
Understanding Pricing Models: Per-Item vs. Kits
When you start exploring professional services, you'll notice they typically charge in one of two ways: per-item or with a pre-paid kit. Kit-based services send you a box of a specific size, and you fill it with a set number of items for a flat fee. This can be a great deal if you have a large, uniform collection that fits neatly into their structure. However, if you have a mix of media or aren't sure of your exact count, a per-item model might offer more flexibility. With services that charge per item, like our photo transfer service at YesVideo, you only pay for what you actually send. This straightforward approach avoids the guesswork of fitting your memories into a pre-sized box and ensures you’re not paying for unused space.
Turnaround Time and Rush Fees
Patience is key when sending your memories away, as standard processing times for most services typically range from four to six weeks after they receive your slides. This allows technicians to give your collection the careful attention it deserves. However, if you're working toward a deadline, like an anniversary or a family reunion, many companies offer expedited processing for an additional fee. This can significantly shorten the wait time, often to just a few weeks or even 10 business days. It’s always a good idea to check the company’s current turnaround times before you order, so you know exactly what to expect and can choose the option that best fits your timeline.
Keep an Eye Out for Sales
It’s worth noting that many slide conversion companies run promotions, especially around major holidays like Mother's Day, Father's Day, and Christmas. You can often find significant discounts, with some services offering deals like 40% or 50% off their regular prices. To catch these sales, consider signing up for the email newsletters of the companies you're interested in or following them on social media. A little bit of planning can lead to substantial savings, making the decision to preserve your entire collection even easier on your budget. It’s a simple step that can make a big difference in the overall cost of your project.
What to Expect from a Mail-In Service
Choosing a mail-in service is all about trust and convenience. The general process is designed to be as simple and secure as possible for you. It usually starts with you placing an order online. The company then sends you a specially designed mail-in kit with everything you need to safely pack your slides. Once you’ve packed your memories and sent them off with a pre-paid shipping label, the real magic happens at their processing facility. At YesVideo, for example, every order is processed by hand by our team of trained technicians right here in the USA. This hands-on approach ensures your irreplaceable slides are handled with the utmost care. After digitization, the company sends your original slides back to you, along with your new digital copies on a thumb drive, DVD, or in the cloud.
The Mail-In Kit Process
When your mail-in kit arrives, you’ll find it’s more than just a box. These kits are thoughtfully designed to protect your memories during transit. Inside, you’ll typically find a sturdy, crush-proof box, detailed instructions, and special barcodes or labels for each piece of media you send. These barcodes are incredibly important, as they allow the company to track your order every step of the way, from the moment it arrives at their facility to the moment it’s shipped back to you. This robust tracking system provides peace of mind, assuring you that your precious slides are accounted for throughout the entire digitization process. The kit also includes a pre-paid return shipping label, making it easy to send your collection on its way.
Quality and Included Features
When you entrust your slides to a professional service, you're paying for expertise and high-end equipment. These services use specialized scanners to capture your images at a high resolution, ensuring the digital versions are crisp and clear. Many companies also include manual enhancements as part of their service. For instance, technicians might perform color correction to restore faded vibrancy, crop the images to perfection, and even apply scratch and dust reduction to clean up the final product. At YesVideo, we believe in a personal touch; our experts handle each photo transfer by hand, ensuring every single slide is treated with care to produce the best possible digital memory for you and your family to enjoy.
Common Limitations to Be Aware Of
While professional services offer incredible convenience and quality, it’s good to be aware of a few common limitations to manage your expectations. For instance, some companies can't guarantee that your slides will be returned in the exact order you sent them. This is often because different types of media are processed on different specialized machines to achieve the best quality. Additionally, if you use a kit-based service and send more items than your kit allows, you may receive a separate bill for the overage. This is another reason a per-item pricing model can be beneficial, as it eliminates any surprise charges. Knowing these details beforehand helps ensure a smooth and predictable experience.
Guarantees and Peace of Mind
The most important promise a professional service makes is to care for your memories. A core part of this is guaranteeing the safe return of your original slides along with your new digital copies. Reputable companies build their entire process around this commitment, using trackable shipping and detailed internal monitoring systems. Many also offer a satisfaction guarantee to ensure you're happy with the quality of your digital files. Furthermore, most services will keep a digital backup of your memories for a limited time, often around 30 days, as an extra layer of security in case anything happens to your order in transit. These guarantees are designed to give you complete confidence when sending your one-of-a-kind memories away for preservation.
YesVideo: What They Offer
YesVideo is a really trusted name when it comes to preserving family memories, and their digital media transfer service is a great choice for your slides. They handle a wide range of analog formats, so if you have more than just slides—like old videotapes or film reels—they can likely digitize those too. One of the things I appreciate is their commitment to processing everything by hand in the USA, which adds a layer of trust and care. They aim for a turnaround time of within 30 days, which is pretty efficient for getting your cherished memories back in a new, lasting digital format. This makes it a convenient option if you're looking to preserve your memories without a long wait and with the assurance of expert handling.
ScanMyPhotos: A Look at Their Services
ScanMyPhotos offers a broad range of scanning services, which is helpful if you have various types of film alongside your 35mm slides, like 120 film or APS film. They provide your digitized images on a DVD or USB, which are standard and convenient options for many people. What’s particularly handy is their add-on service to upload your images to the cloud, as Tom's Guide mentions. This gives you easy access to your memories from anywhere and makes sharing with family members straightforward. If you're looking for flexibility in how you receive and access your digital files, ScanMyPhotos provides some good choices to consider for your slide conversion project, especially if online accessibility is a priority for you.
DigMyPics: Is It Right for You?
DigMyPics focuses on converting slides and negatives into high-quality digital files, emphasizing attention to detail. If the final image quality is a top priority for you, their specialization could be a significant advantage. They offer various delivery options, ensuring you can get your memories back in a format that works best for your needs. According to Nostalgic Media, their service is geared towards preserving memories with a focus on quality, which is reassuring when you're dealing with irreplaceable family photos. This makes them a solid contender if you're seeking a service that really concentrates on the finer points of the digitization process for slides and negatives, ensuring each image is treated with care.
Memories Renewed: How They Work
Memories Renewed positions itself as a service offering a personalized touch for converting slides, negatives, and photos. If you prefer a more boutique experience or have specific concerns about your collection, their approach might be very appealing. Their commitment to quality and customer satisfaction, as highlighted by Smooth Photo Scanning, suggests they take great care in their work. This focus on a personalized service can be particularly comforting when you're entrusting precious, one-of-a-kind slides. For those who value a high degree of care and a service tailored to individual needs, Memories Renewed is certainly worth looking into for a more hands-on, communicative experience.
Legacybox: What to Expect
Legacybox is well-known for its comprehensive digitizing service, handling a wide array of media types, including photographic slides. They often emphasize the importance of preserving memories for future generations, which really resonates if your goal is to create a lasting family archive. Their process involves sending you a box to fill with your media, which simplifies the shipping aspect—you just pack it up and send it off. As Capture mentions, services like Legacybox are great for those looking to safeguard their family history. If you have a mix of media beyond just slides—like tapes, film, and photos—Legacybox offers a convenient way to get it all digitized in one go.
How to Choose: A Breakdown of Cost, Quality, and Speed
Figuring out the best way to bring your treasured photographic slides into the digital age means looking closely at a few important things: what it's going to cost, the kind of quality you're hoping for, and how quickly you need the job done. It’s a bit like planning any important project – you want to understand all your choices so you can pick the one that feels right for you and your family’s memories.
Whether you decide to handle the conversion yourself or enlist the help of professionals, each route has its own set of pros and cons. Maybe you have a bit more time on your hands and enjoy a good DIY project, or perhaps the idea of experts carefully handling your slides and delivering beautiful digital images sounds more appealing. There’s no single "right" answer, but by exploring these factors, you’ll be able to make an informed decision that aligns with your budget, your expectations for the final product, and your timeline. We'll walk through what to consider for cost, the differences in image quality you can expect, how fast each method typically is, and what the overall price really gets you. This way, you can feel confident you're choosing the best path forward for preserving those irreplaceable moments.
DIY vs. Professional: What's the Cost?
When you start thinking about your budget, the initial costs for doing it yourself versus hiring a professional service can seem quite different. If you opt to manage the project on your own, your main expense will be purchasing a slide scanner. You can find basic models for around $16, while more advanced scanners with better features might cost over $200. This is a one-time investment, which can be attractive if you have a very large collection of slides.
On the other hand, professional services usually charge on a per-slide basis. Prices can range from approximately $0.42 to $0.95 for each slide scanned. While this might seem like it could add up, remember that this fee often covers expert handling, high-quality scanning equipment, and the convenience of not having to do the work yourself. For many, the assurance of quality and time saved by using a photo transfer service makes the per-slide cost a worthwhile investment, especially for precious family memories.
Which Method Gives the Best Image Quality?
The final appearance of your digitized slides is incredibly important, and both resolution and overall image quality are key factors here. If you choose the DIY route with your own scanner, you'll generally find that selecting a higher resolution setting will give you a more detailed and clearer image. However, be aware that scanning at higher resolutions can significantly slow down the process. Some home scanners also come with automated features like dust and scratch removal, which can certainly help improve the final look of your images.
Professional services, like those we offer at YesVideo, are designed to deliver top-notch quality. We use specialized, professional-grade equipment and refined processes to capture the best possible digital version of your slides. While it might seem like a larger initial investment, opting for professional slide scanning often means you receive consistently higher quality images, expert color correction, and the careful handling that your irreplaceable memories deserve, saving you both time and potential disappointment.
How Fast Is Each Slide Conversion Method?
Your time is precious, so thinking about how quickly you want your slides digitized is an important consideration. If you decide to use a professional scanning service, the turnaround time is usually quite clear. Many services, including YesVideo, work to process orders efficiently. You can typically expect your digital memories back within a couple of weeks; a common timeframe is around 7-10 business days after they receive your slides. This means you can send off your collection and get your digitized memories back without the project taking over your personal schedule.
If you're considering the DIY approach, the speed of the project is largely up to you, but it heavily depends on the equipment you use and, critically, the number of slides you need to convert. Scanning slides individually, or even in small batches, can be a very lengthy undertaking. What might initially seem like a weekend task could easily turn into weeks or even months if you have a substantial collection.
What's the Real Price Tag for Each Method?
When you look at the cost, it's helpful to consider the complete value you receive with each option, not just the initial numbers. As we've noted, DIY scanner prices can vary, from quite affordable basic models (around $16) to over $200 for scanners with more capabilities. This cost covers the equipment, but then you'll be investing your own time and effort into the scanning process, organizing the digital files, and any necessary image editing.
Professional services might seem more expensive upfront, but the price often includes a lot more than just the scan itself. You're paying for the expertise of trained technicians, the use of high-end equipment you don't have to buy or learn to use, quality checks, and often convenient features like online viewing galleries or digital downloads. Companies like YesVideo are dedicated to making the entire digitization process straightforward and reliable, ensuring your memories are handled with the utmost care from the moment they leave your hands until they're returned to you as lasting digital keepsakes. This can save you a significant amount of time and provide valuable peace of mind.
What Scanner Features Actually Matter?
When you're ready to bring those treasured photographic slides into the digital age, it’s tempting to think any method will do. But the truth is, the features of the scanner or service you choose can make a world of difference to your final results and your overall experience. It's not just about getting a digital copy; it's about creating a lasting, high-quality archive of your precious memories that you can easily share and enjoy for years to come. Think about what you envision for these images – perhaps you dream of creating beautiful photo albums for your family, putting together a heartfelt slideshow for an anniversary, or simply having the peace of mind that your history is safely preserved.
The right features will ensure your digitized slides look their absolute best, capturing the original vibrancy and detail. From the sharpness and clarity of the image (resolution) to how simple the whole process is, paying attention to a few key details can transform your project from a chore into a delightful journey of rediscovery. We'll walk through the most important features to look for, whether you're considering a DIY approach with a personal scanner or opting for a professional service. This way, you can feel confident you're making an informed choice that truly honors your family's legacy and gives your memories the digital makeover they deserve.
Don't Compromise on Resolution and Image Quality
When you're converting your slides, the goal is to capture every bit of detail and color as faithfully as possible. That's where resolution and image quality come in. High-resolution scans mean your digital images will be sharp and clear, perfect for making prints, enlarging photos without them looking blurry, or just enjoying them on a high-definition screen. Think of it like this: the higher the resolution, the more information from your original slide is preserved. This ensures that the vibrant colors of a birthday party or the subtle details in a landscape shot are beautifully maintained. For instance, services like YesVideo provide your digitized memories on convenient formats like DVD, USB, or even cloud storage, making it easy to access and enjoy your high-quality images.
How Easy Is It to Use? (And What Software Do You Need?)
Let's be honest, tackling a big box of slides can feel a bit daunting! That's why the ease of use of whatever scanner or service you choose is so important. If you're going the DIY route with a scanner, look for one with a user-friendly interface and straightforward software. You don't want to spend hours figuring out complicated settings. Some scanners even come with software that offers helpful automated features, like adjusting brightness or attempting to remove tiny dust specks, which can really streamline the process. A smooth, intuitive experience means you're more likely to see the project through and enjoy the journey of rediscovering your memories, rather than getting bogged down in technical frustrations.
Does It Support Your Slide Formats?
Before you commit to a scanner or a service, double-check that it can actually handle the types of slides you have. While the classic 35mm slide is the most common, slides do come in other, less common formats. You might have some from a different era or a special type of camera. It’s a good idea to take a quick inventory of your collection. Making sure your chosen method is compatible with all your slide types from the get-go will save you potential headaches later. Professional services, like those offered by YesVideo for various film types, are often equipped to handle a wide array of formats, ensuring all your memories can be preserved.
Can It Fix Dust and Scratches Automatically?
Over the years, even carefully stored slides can accumulate dust or pick up tiny scratches. These little imperfections can really show up on a digital scan, sometimes more than they do when you hold the slide up to the light. That's why features or services that address dust and scratch removal are a huge plus. Some scanners have built-in technology, often called Digital ICE (Image Correction and Enhancement) or similar, that can automatically detect and reduce the appearance of these blemishes. This can significantly improve the quality of your final images and save you a lot of time trying to edit them out manually later. It’s a feature that truly helps your old memories shine.
Have a Lot of Slides? You'll Want Batch Scanning
If you're looking at a mountain of slide carousels or boxes, the thought of scanning them one by one can be overwhelming. This is where batch scanning capabilities become a lifesaver. Some scanners are designed to handle multiple slides at once, or you can load a whole tray. This feature can drastically cut down the time and effort involved in digitizing a large collection. Turning your slides into digital files not only safeguards them from physical damage but also makes them incredibly easy to organize, share, and enjoy. If you have hundreds or even thousands of slides, choosing a method that supports batch processing will make the entire project much more manageable and enjoyable.
How to Prep Your Slides for Perfect Scans
Getting your slides ready for their digital debut is a really smart move. A little bit of prep work now can make a huge difference in the quality of your digitized memories and make the whole process, whether you're doing it yourself or sending them to a professional service, much smoother. Think of it as giving your cherished moments the VIP treatment before their big reveal! It’s all about ensuring those precious images look their absolute best when they’re transformed into digital keepsakes.
Step 1: Organize and Clean Your Slides
Before you jump into scanning, it’s a great idea to gather all your slides in one place. Take some time to go through your collection. This helps you see exactly what you have and plan your digitization project effectively, so no special memory gets left behind. As you sort, keep an eye out for any slides that look particularly dusty or might have fingerprints on them.
Slides are quite delicate, so handling them gently is key. To prevent any smudges or oils from your fingers from getting on the slide's surface, it's wise to wear cotton gloves. If you spot any dust, a soft, anti-static photo brush or a gentle puff from a can of compressed air (used carefully from a safe distance) can help clean them up. This simple cleaning step can significantly improve the clarity and quality of your final digital images.
Step 2: Choose the Right Digital File Format
Choosing to digitize your slides is one of the best ways to protect them from physical damage, fading over time, or even accidental loss. Once they're in a digital format, your memories become so much easier to organize, share with family and friends near and far, and enjoy on all your modern devices like computers, tablets, or even your smart TV. It’s a truly important step in preserving these irreplaceable images for future generations to enjoy.
When it comes to digital file formats, you'll want something that maintains good quality without creating files that are too massive to manage easily. Common formats like JPEG are fantastic for easy sharing and everyday viewing because the file sizes are manageable. For archival purposes, TIFF files are often preferred because they are "lossless," meaning they retain all the original image data, ensuring the highest quality. If you're using a slide transfer service like YesVideo, they’ll typically select the most suitable formats to ensure your memories are beautifully preserved and readily accessible, taking that decision off your plate.
Stuck? How to Fix Common Slide Conversion Issues
Converting your treasured slides to digital format is a wonderful way to preserve them, but sometimes you might run into a few hiccups. Don't worry, these are common issues, and I'm here to walk you through how to handle them. It's completely normal to encounter a faded slide or feel a bit swamped by a large collection. With a little know-how and some practical steps, you can ensure your memories look their best in their new digital home, ready to be shared and enjoyed for years to come.
What to Do with Damaged or Faded Slides
Over time, photographic slides can certainly show their age. You might notice that the vibrant colors have shifted or faded, or perhaps there's physical damage like scratches, dust, or even mold. This is a common concern, especially with older family collections. While some minor imperfections can often be touched up with basic photo editing software after scanning, it's true that "in some cases, the scanned image from a slide may need more advanced photo restoration."
If your slides are significantly damaged or badly faded, trying to fix them yourself with standard home scanning equipment might not give you the results you're hoping for. For those truly precious but delicate memories, considering a professional service can be a game-changer. Companies specializing in photo transfer often have specialized tools and the expertise to carefully handle and restore color and clarity, giving your cherished images a new lease on life.
Feeling Overwhelmed? Tips for Tackling Large Collections
Facing a mountain of slide carousels or boxes can feel pretty overwhelming! If you've inherited or accumulated a large collection, the thought of tackling them all might make you want to put the project on the back burner. But trust me, a little organization upfront can make a world of difference. Before you even think about the scanning process, it's a great idea to "take the time to review your memory collection." Gather all your slides together in one place so you know exactly what you're working with.
Once you have them all, try sorting them. You could organize them chronologically if you can, by specific events (like holidays or vacations), or by family groups. Whatever system makes the most sense for your collection is the right one. This not only helps you plan the digitization process more effectively but also makes it much easier to find and enjoy your photos later. You might even discover some duplicates or slides you don’t feel the need to digitize. Taking these preparatory steps will make the entire project feel more manageable.
The "Buy and Resell" Strategy for Large Projects
If you're looking at a collection of thousands of slides, you might consider the "buy and resell" approach. The logic is pretty straightforward: you purchase a quality scanner for the job, spend the time digitizing your collection, and then sell the equipment to get some of your money back. With basic scanners available for under $20 and more advanced models costing over $200, it can feel like a more budget-friendly path than a professional service, especially if you believe you can recoup most of the hardware cost. This strategy gives you complete control over the timeline and the process, which can be appealing if you enjoy hands-on projects. However, it's important to factor in the significant time you'll need to invest, not just in scanning, but also in learning the equipment and software, and then later, in finding a buyer for your used scanner.
Why Scanning at Home Can Be Tedious
While the idea of a DIY project can be exciting, the reality of scanning slides at home can be quite tedious. What seems like a fun weekend task can quickly stretch into weeks or even months, especially with a large collection. Scanning slides one by one, or even in small batches, is a very lengthy undertaking. A major part of the work isn't just the scanning itself, but the preparation. You'll likely spend a good amount of time carefully cleaning dust marks and fingerprints off each slide to get a clear image. This meticulous, repetitive work can be draining. When you consider the time and effort involved, you might find that letting experts handle the job is a better fit. Entrusting your memories to a service like YesVideo for a professional photo transfer means you get to skip the tedious parts and simply enjoy the beautifully preserved results.
How to Get Accurate Colors in Your Scans
One of the main goals when you convert slides to digital is to capture those original colors as accurately as possible. Unfortunately, dust, fingerprints, and smudges are the enemies of a good scan and can lead to disappointing color results or unwanted blemishes on your digital images. The good news is that a little prep work can go a long way in preventing this. As experts often advise, "Cleaning slides before digitizing is essential. Dust and smudges can affect the quality of the scan, leading to inaccurate colors."
Always try to handle your slides by their cardboard or plastic mounts to avoid touching the film itself. If you have them, wearing lint-free cotton gloves is a great idea. You can use a soft, clean brush or a can of compressed air (the kind designed for electronics) to gently remove any loose dust from the slide's surface. Also, don't forget to ensure the glass on your scanner (if you're using one) is spotless. Starting with a clean slide provides the best foundation for vibrant, true-to-life digital images.
You've Digitized Your Slides—Now What?
Once your precious photographic slides are transformed into digital images, the journey to preserve and enjoy them continues! It’s not just about converting them; it’s about making sure these memories are safe, accessible, and easy to share with everyone you love. Taking a few extra steps after digitization can make all the difference in keeping those moments alive for years to come. Let's look at some simple yet effective ways to manage your newly digitized treasures.
Safely Store Your Photos in the Cloud
Think of cloud storage as a secure, digital home for your slides. When you digitize your photos, services like YesVideo can deliver your files on a DVD or USB, and many, including ours, offer the option to upload them directly to the cloud. This is incredibly handy because it means you can access your photos from almost any device, anywhere with an internet connection. Plus, it’s a fantastic way to share albums with family and friends without worrying about large email attachments or passing around a single USB drive. Cloud storage also adds an extra layer of protection against losing your photos if your computer or local drives happen to fail, giving you peace of mind.
Bring Memories to Life with Digital Albums and Slideshows
One of the real joys of having your slides in digital format is how easy it becomes to relive those moments. Turning your slides into digital files means they're safe from the physical wear and tear that can affect old slides. You can organize them into beautiful digital albums, perhaps one for each year or special occasion. Imagine creating a heartwarming slideshow for a family gathering or an anniversary! It’s a modern way to share your cherished memories and bring those frozen moments back to life for everyone to enjoy together. This makes it much simpler to browse, find specific images, and share your history with younger generations.
Create a Foolproof Backup Plan for Your Photos
If your slides were the only copies of those images, having a solid backup plan for your new digital versions is absolutely key. Think of it as an essential safety net for safeguarding your memories. It's wise not to rely on just one storage method. A good strategy involves keeping copies in multiple places. For instance, you might use a cloud storage service and also keep a copy on an external hard drive that you store in a safe, separate location. This way, if one backup fails or gets damaged, you’ll have another to fall back on, ensuring your digitized film memories are protected for generations to come.
Choosing the Right Slide Conversion Method for You
Deciding how to turn your treasured photographic slides into digital files really comes down to what’s most important for you—whether that’s saving time, sticking to a budget, or getting the absolute best image quality. You essentially have two main routes: tackling the project yourself (DIY) or letting a professional service handle your memories with care.
If you're thinking about the DIY approach, your first step will be to select the right equipment, like a dedicated slide scanner or perhaps a slide duplicator attachment for your existing camera. This path gives you complete control over the process, which many people appreciate. However, it’s good to keep in mind that converting slides yourself can be quite time-consuming, especially if you have a large shoebox (or several!) full of them. Plus, achieving accurate colors and dealing with pesky dust or scratches can sometimes present a bit of a learning curve.
On the other hand, professional services, like what we offer here at YesVideo, are specifically set up to manage these details for you. We often hear from families how much they value the careful attention that ensures their digitized slides look their very best. It’s true that not all digitization services offer the same level of expertise or care. When you’re looking at different options, especially for older slides that might need a bit more TLC, it’s wise to consider if they can provide future-ready formats that will keep your memories accessible for years to come. Ultimately, the aim is to safeguard your memories, making them easy to share and enjoy, so choose the path that feels most comfortable and right for your precious collection.
Related Articles
- How to Transfer Slides to Digital: DIY & Pro Guide – YesVideo
- Convert Slides to Digital Pictures: DIY & Pro Guide – YesVideo
- Convert Photo Slides to Digital: DIY & Pro Guide – YesVideo
- Digitize Photos: The Ultimate Guide for 2024 – YesVideo
- Digitize Slides to Images: Top Services & DIY Guide – YesVideo
Frequently Asked Questions
My slides are really old and some look faded. Is it still worth trying to digitize them? Absolutely! Even if your slides have seen better days, digitizing them is a fantastic step. Professional services, especially, often have techniques to help improve faded colors and enhance clarity. While perfection isn't always possible for very damaged slides, creating a digital copy is the best way to halt any further aging and preserve the essence of those precious moments for the future.
I have hundreds, maybe even thousands, of slides! What's the most efficient way to tackle such a large collection without it taking forever? That's a common situation, and it can feel a bit like facing a mountain! If you're set on doing it yourself, look for scanners that offer batch scanning – this lets you load multiple slides at once, which is a huge time-saver. Organizing your slides into logical groups before you start also helps. However, for really extensive collections, a professional service is often the most efficient route. They have the equipment and processes to handle large volumes smoothly, getting your memories back to you much faster than most DIY setups.
If I decide to use a professional service, what’s one key thing I should look for to ensure my memories are in good hands? That's a really smart question! Beyond just looking at the cost, I always suggest paying close attention to how they describe their handling process and what their reputation is like. You want a service that clearly outlines how they care for your original slides – for instance, do they process them by hand? Reading customer reviews and seeing if they have experience with delicate or irreplaceable media can give you real peace of mind that your memories will be treated with the respect and care they deserve.
I'm thinking of buying a scanner to do this myself. What's more important: getting the highest possible resolution or having features like dust and scratch removal? Both are definitely valuable, but the best choice for you can depend on your slides and what you hope to do with the digital images. High resolution is fantastic for capturing fine details, especially if you dream of making large prints or viewing your images on big, crisp screens. However, if your slides have collected dust over the years (which is very common!), a scanner with effective automatic dust and scratch removal can be a lifesaver, drastically improving the final look and saving you hours of editing. If you can find a scanner that offers a good balance, that's ideal!
Once my slides are all digital, what’s the best way to make sure I don’t accidentally lose them all over again? This is such an important step! My best advice is to not rely on just one storage spot. Think about creating a couple of backups. A great approach is to keep copies in different places – for example, you could save them to an external hard drive that you store safely, and also use a reputable cloud storage service. This way, if something happens to one copy (like a computer crash or a lost drive), your cherished memories are still secure in another location.